|

Back to Contents
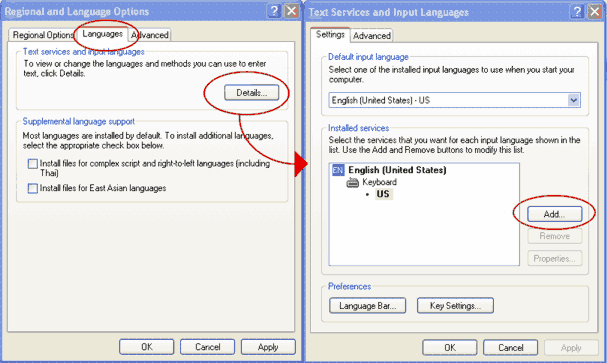
Installing Cyrillic keyboards in Windows XP or Vista
Customizing your keyboard
Typing Cyrillic on other people's computers
Cyrillic in GW computer labs
Cyrillic in Internet browsers
Additional
issues (Windows system fonts)
Russian E-Mail
Inserting stress marks in
Cyrillic
|

RUSSIAN E-MAIL
WEB-BASED E-MAIL. All the popular web-based e-mail programs (Gmail, Hotmail, MSN-Mail, Yahoo) support Cyrillic by default. However, occasionally, you have to tweak a setting. Russian e-mail usually works best when you are sending in UTF-8 and Formatted Mail (also known as "Rich-format," "HTML"; in other words, NOT "plain text") Go to your mail's help screen and search for UTF-8. Make sure that everything, especially outgoing mail, is set to that. This will not in any way affect e-mail sent to you in other foreign languages.
OTHER E-MAIL SYSTEMS
Most e-mail systems are smart enough to figure out how to display Cyrillic
properly without additional coaxing. A hidden line of
code in the e-mail header usually tells the e-mail program or browser how the
Cyrillic is encoded.
GroupWise. Alas! Many GroupWise is incapable of sending Cyrillic reliably.
(Likewise, you cannot send Cyrillic mail to people in GroupWise with any assurance that they will be able to read it.) Russian is likely to come out in the form of question marks or little boxes. Give up. It can't be fixed. (But see "My institution does not support Cyrillic in e-mail!" below.)
Outlook, Outlook Express, Mozilla Messenger, Mozilla
Thunderbird, and Entoutage are Cyrillic friendly. Set defaults as follows:
Default encoding (look under View => Encoding or under
Settings => Encoding): UTF-8. This allows you to write multilingual
e-mail.
Plain Text / Rich Formatting (also called Formatted Mail or
HTML-formatting) Always choose Rich Formatting. Cyrillic sent in Rich
Format from an Cyrillic-unfriendly system often survives. Plain text Cyrillic
sometimes gets murdered.
Sometimes, you can restore murdered Russian by adjusting how your e-mail
program displays the Russian...
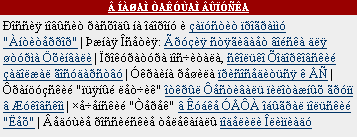
If you see lots of European accented vowels, mostly lowercase,
hit View=>Encoding=>Cyrillic
- Windows. This will return you to your mailbox inbox. (If
it doesn't, hit View=>Encoding=>Cyrillic
- Windows again.) Now click on the message again. It
should come out in Cyrillic.
If you see mostly uppercase European accented vowels, hit
View=>Encoding=>Cyrillic
KOI-R. This will return you to your mailbox inbox. (If it
doesn't, hit View=>Encoding=>Cyrillic
KOI-R
again.) Now click on the message again. It should come out in
Cyrillic.
"MY INSTITUTION DOES NOT SUPPORT CYRILLIC E-MAIL!" Yes, this happens. There was a time when even a famous Russian-related research oragnization could not read e-mails sent by Russian colleagues. But there's always a fix — a way that you can send and receive mail using your institutional e-mail address. The solution below is given for Gmail, which is the default e-mail carrier for the George Washington University. However, a similar solution may work for other Web-based e-mail systems like Yahoo or MSN mail.
Assume for a moment that you are someone@state_university.edu.
- Get a Gmail account. We'll call this account someone@gmail.com. You will use this account to "spoof" or masquerade as your institutional account. Don't worry. It's safe and legal.
- Now, make sure that all incoming mail goes to your new Gmail account. Go to your old someone@state_university.edu account. Set up forwarding rules so that all the mail coming to that address now goes to someone@gmail.com. (You'll have to ask the tech people at state_university.edu how to start forwarding. It's different for each institution.) Make sure that when invoking forwarding, you tell the someone@state_university.edu account not to keep a copy of the mail at State University's server. After all, you won't be dealing with that server anymore, and there's no sense in clogging up their mail service. At this point, you're halfway done. From now on, any mail written to you at someone@state_university.edu will show up in your new someone@gmail.com account.
Of course, it would be nice if when you replied, your correspondent saw that the mail was coming from your "old" self: someone@state_university.edu and not the new Gmail account. We will fix that in the next few steps.
- Go into Gmail settings (top left of the computer screen). Go to Accounts (second menu item from the left).
- In Accounts, under Send Mail As, choose Add another e-mail address you own. Enter your old someone@state_university.edu. In the following screen, Gmail will have you verify that you really own that account. (Just follow the directions.)
- Once the account has been verified in Accounts, under Send Mail As, on the right-hand side of the screen, click Make Default. That means that from now on, whenever you reply from your new someone@gmail.com account, the person you write to will see the mail as having come from someone@state_university.edu. (This is easily modified.)
- Finally, decide whether you always want to be seen as someone@state_university.edu or whether if someone writes you directly as someone@gmail.com, your reply will be marked at from someone@gmail.com. That's the radio button choice further down the screen:
When receiving a message:
- Reply from the same address the message was sent to
- Always reply from default address (currently rrobin@gwu.edu)
You're done. From now on, you're using Cyrillic-friendly Gmail. But your identity is still someone@state_university.edu.
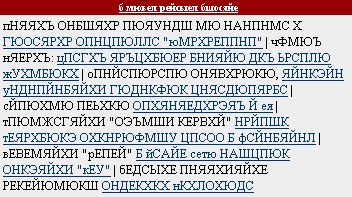
BUT I STILL SEE CYRILLIC AS ????? ???? ?? ??????! If you see question marks or little boxes instead of Cyrillic letters, someone is trying to send you Russian from an old e-mail system (like Wisemail) that does not support Cyrillic. Делать нечего! You have to send them to this page and have them switch e-mail systems.
|